First Steps With Developing An Application…
Contents
First Steps With Developing An Application…#
spot
This section will:
Demonstrate the basic development workflow that will be used during this course
Introduce the various development tools that we will use for software development and testing
Introduce
Pythonlanguage through a simple application
This section aims at introducing our software development workflow, the main tools we’ll use during course and provide some general remarks on the working methodology that we expect you to use during this course. Whether you are new with software development, or whether you consider yourself as an expert, we urge you to read this introduction carefully. We want to insist that this course (and the resulting grade!) is not only about completing the exercises but also about learning and using best practices and producing a software of good quality.
Presentation of the Development Workflow#
During this course, you will use a development workflow representative of software development in the scientific world, especially in the context of scientific collaborations. The challenge in this context is to produce a software that not only fulfills the immediate needs and goals but will also be maintainable and can be improved to address evolving requirements. In addition, the software development generally involves several different people and relies on software components (for example libraries) that have been developed by others and that you do not have direct control on.
For this reason a typical workflow in scientific collaborations is:
A user produces some new code, using an editor or a more advanced tool called an IDE (Interactive Development Environment).
Depending on the language, the user may have to compile his/her code. This will not be the case during this course since we’ll be using
Pythonwhich is an interpreted language.The changes made are registered into a versioning system. During this course we’ll be using
Git.The user executes some local tests to validate that his/her contribution is correct and not breaking something else. To identify the cause of the problems, he/she uses a debugger that allows a step-by-step execution of the application, checking the values of variables, arguments to functions…
Once the problems are fixed, the changes made are also registered (commmitted) into the versioning system and all the changes are regularly pushed to a central repository hosting the collaboration software.
After the changes have been pushed, without any intervention of the user, some tests are automatically run to validate the changes against an (ideally) exhaustive test suite. In particular, these tests allow to prevent reintroducing an old bug (this is called regression testing). These tests run once a user pushed his/her changes are referred as continuous integration.
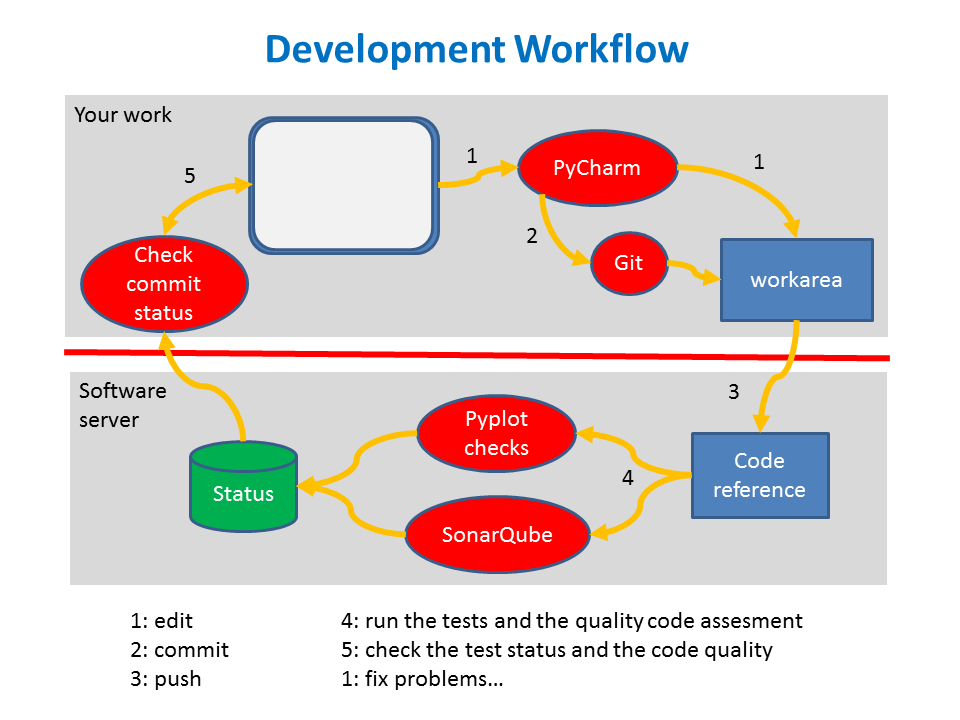
During this course, each student will work independently of other students, and you are not expected to actually merge your developments with. Nevertheless, you will use the workflow described above, in particular:
An IDE for developing and debugging your code,
PyCharm, well suited for developing Python applicationsVersioning of your changes, using
Git. You will have both a local Git repository on your machine that you will use frequently to register (‘commit’) and version your changes (later in this section, you will learn how to use it for looking at the history of your changes) and a reference repository (playing the role of the central repository in a collaboration) where you will push your changes when you think they are ready.When you have pushed your changes on the reference repository (staying in a central remote server), two tests will be run: one to assess the quality of your code (using
SonarQube), the other one to check the correctness of your results. We’ll present later in this section how you will be able to look at the output of the tests.
The development cycle is iterative : after looking at the test results, you may identify problems that you have not spotted initially. In this case, you fix them, register and push the fixes and test them… until you are satisfied.
spot
Pushing to your reference repository something that is not perfect or has problems is not considered a mistake at all and will not impact your grade, if you take into account the test results and fix the problems in subsequent versions. This applies both to the code quality test and the result validation.
Remarks on Following Exercises#
First steps with these tools are organized around the development of an Hello World Program written using the
Python language. Starting with this simple program, you should focus on the following aspects that will be
true for all exercises during this course.
We’ll proceed in a step-by-step fashion: it is therefore very important to make sure you go through all the proposed stages, understanding every stage before moving further on.
You should pay a lot of attention about your style and code clarity:
define, use and follow coding conventions as presented in the associated presentations
give sensible names to variables and functions
properly document your code.
It is very important to regularly test your code to ensure a safe progression through the exercises. In practice, this means that you should always test your code as soon as a new feature has been implemented and not only at the end of the exercise.
After each evolution in your work, be sure to commit your changes in
Gitto keep track of your changes and to allow to go back in case you did something wrong. Note that committing changes must be done as many times as necessary, typically:after every editing change and before testing
after fixing every problem found during testing.
DO NOT restrict yourself to committing only the final version of your work…
Step 1: Prepare Your Work Area#
This first step allows you to check that the development tools we’ll use are properly installed and to create your Git working area.
Check your environment#
The main applications we’ll need during this course are:
They should all be present in the Dock, a bar of icons at the top left of your screen : 
Initialize your project#
PyCharm is the environment that will be used to develop, test and execute applications during this course.
It features in particular a Python-aware editor that helps writing correct code, highlighting the syntax and
detecting the trivial mistakes.
This is quite important to initialize and configure it as indicated, to remain consistent with the documentation. For details on the steps below, in particular to see screen copies of what is involved, refer to the PyCharm Introduction.
The work done will be registered in a versioning system called Git.
This will allow
to back up what has been done,
to keep track of the successive versions of the programs
to come back to a previous version if needed (look at Git Slides for more details).
The Git repository associated with the project will be created by cloning a centrally hosted one (called reference repository) which already contains some materials that will be used during this course:
Skeletons of the programs that will be developed in the successive exercises
A set of libraries with helper functions that will be used to complete the exercises
A
docdirectory with all files needed to start a static Web site, grabbing documentation from inside the code
Launch PyCharm by clicking on its icon. When starting PyCharm should give you the choice between:
Create New ProjectOpenGet from Version Control
Warning
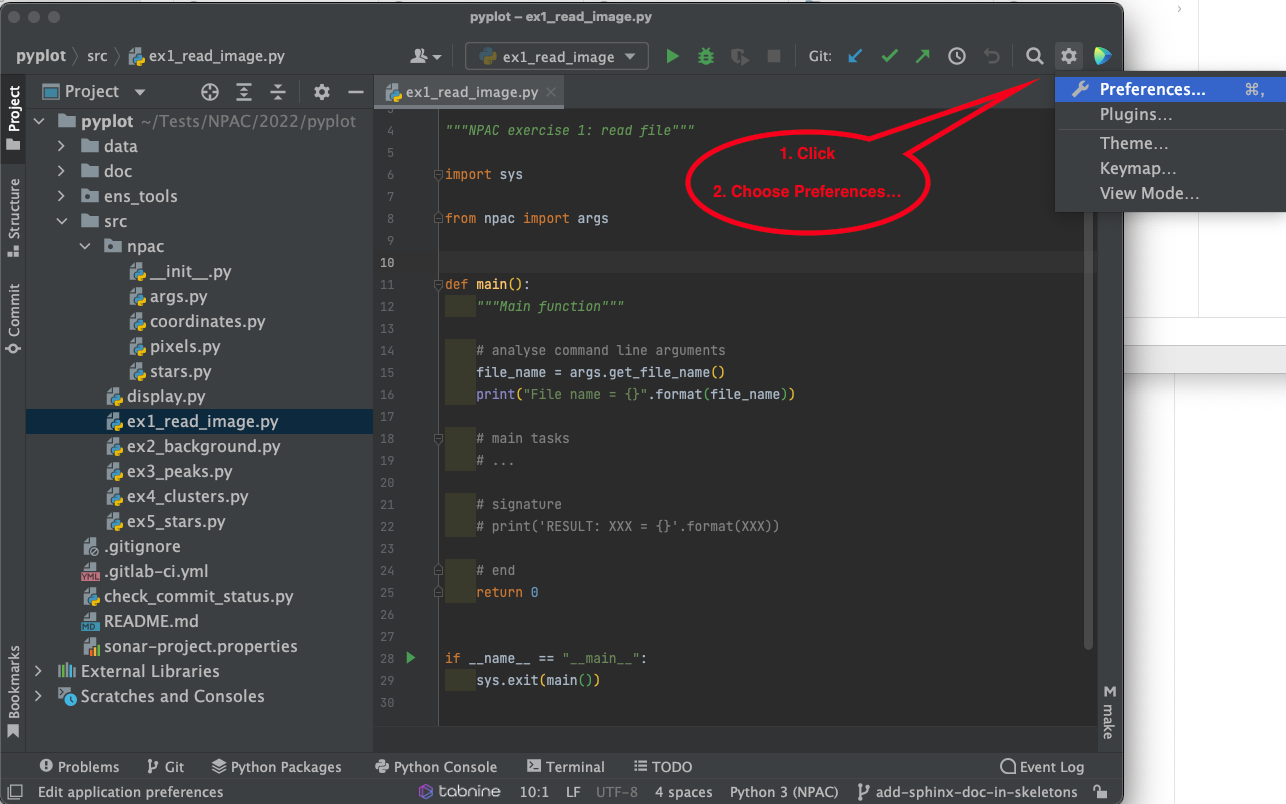
If PyCharm is opening an already existing project when starting, close it with the menu
.
Choose Get from Version Control, select Git and then in the dialog
enter the following information:
Git Repository URL:
git@gitlab.lal.in2p3.fr:npac<NN>/pyplot, where<NN>should be replaced with your userid number (01, 02, 03…). Accept the SSH key if prompted to do so.Directory Name: a name representing the project, like
npac-course.Click on
Clonebutton and once the project has been checked out, you will be asked if you want to open the project: answerYes(closeTipspopup window) and a window giving access to project files andPyCharmmenus and tools will be displayed. Near the top-right corner, you should see the commit button ( ) that will
allow to interact with
 GitfromPyCharm.
Initial contents of your working area#
After cloning the reference repository, you should have the following directories in your working area.
The
srcdirectory contains source files for your applications. There are two groups of files:Skeletons for exercises
ex1_read_image.py, ex2_background.py, ex3_peaks.py, ex4_clusters.py, ex5_stars.py, display.py
Libraries providing helper functions
npac/args.py, npac/coordinates.py, npac/stars.py, npac/pixels.py
The
datadirectory contains 3 images representing different portions of the sky:common.fits: an image common to all students. It is provided to help you to check your developments. For each exercice, you will be given the exact output that your program should produce, when applied tocommon.fits.specific.fits: an image different for each student. For each exercice, you can apply your program to your imagespecific.fits, and check if it is running fine, but you will not know what is the expected output. Each time you push your code to the reference repository, the continuous integration system will apply your programs to yourspecific.fits, and the signatures will be compared to the secret exected ones, so to check that your code is doing the right thing. So to see the final diagnostic of the continuous integration, executecheck_commit_status.py.global.fits: the global image of the Bode’s galaxy. It covers a much larger region of the sky than the previous images: in fact,common.fitsand thespecific.fitsof each student pair are a subset of this global image. You can use it as a third image, with different characteristics, to check that your programs are working correctly.
The
docdirectory contains technical files and document files in order to build a static Web site with all documentations put in the code:conf.py
the Sphinx configuration file
Makefile
the build file with its
htmltargettextual restructuredTxt files
index.rst, exercices.rst npac.rst, args.rst, coordinates.rst, pixels.rst and stars.rst
_static
a directory with a logo for the site
check_commit_status.py(in the top directory): a script that you will use to get the results of the validation tests. Without any argument, it should return the status of test executed after your last push. At this point, you should be able to use it (CTRL-click on the file name and selectRun) and get the test result for the initial contents of the directory.
Checks#
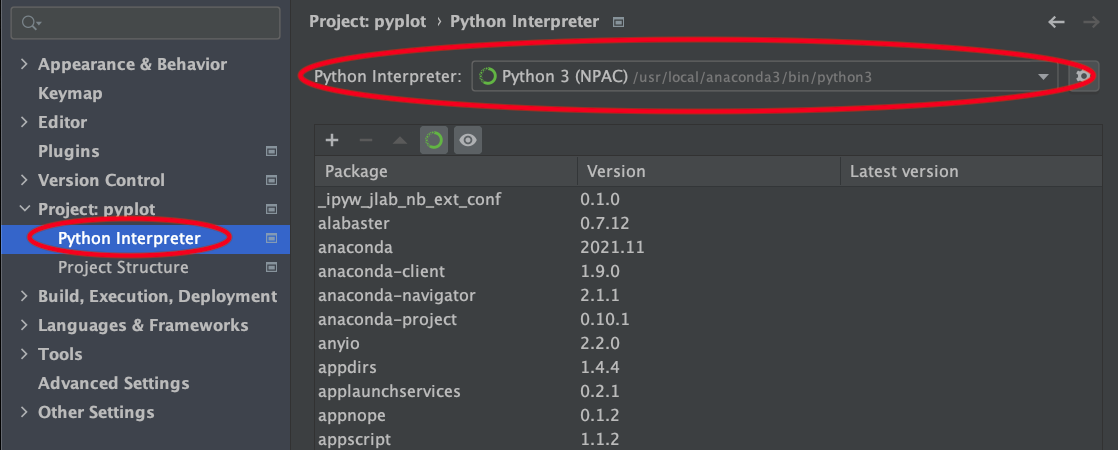
At first, you should verify the environment associated with the project; it must be the NPAC Anaconda environment:
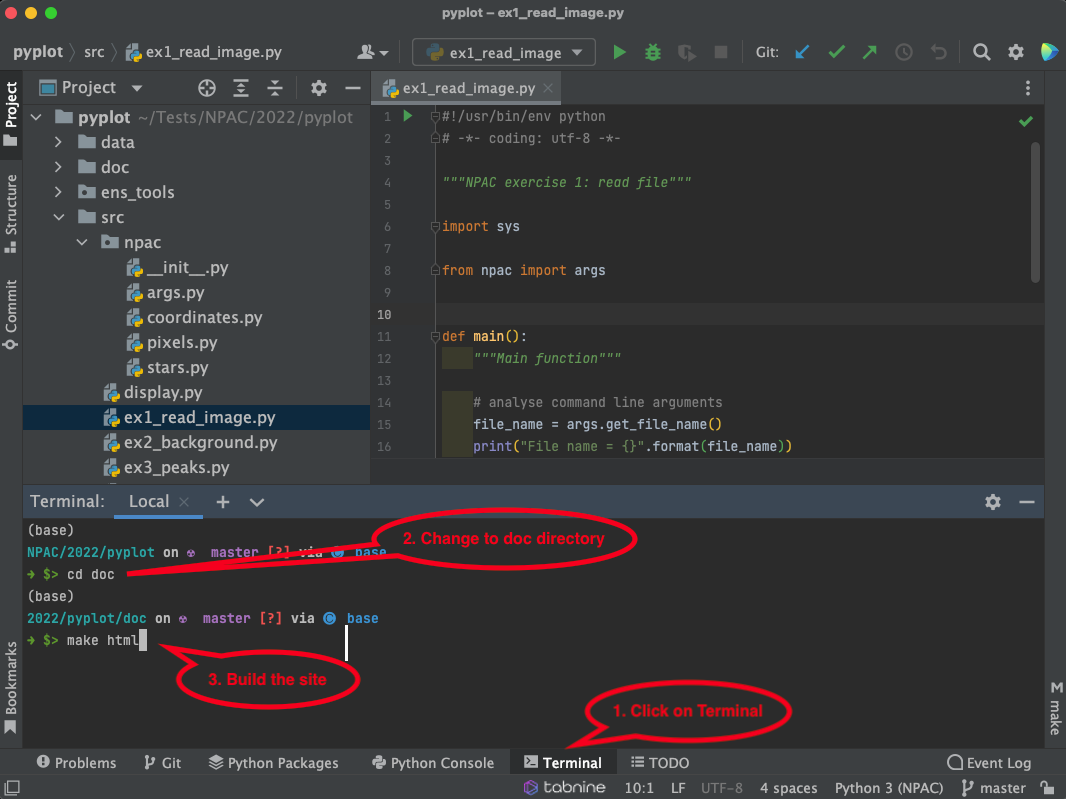
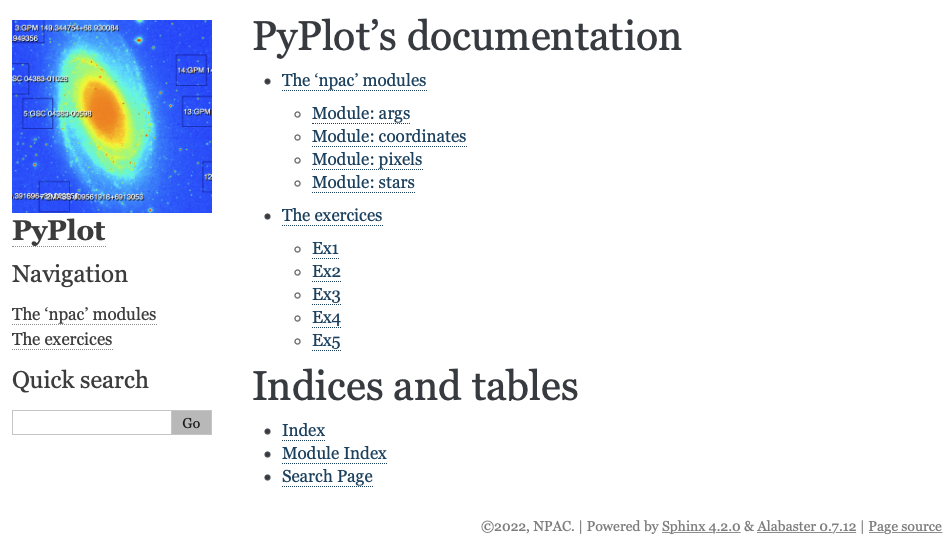
Then you may build the documentation associated with the project:
Step 2: Building a Simple Application#
This step illustrates the development cycle of an application through a simple “Hello World” program:
source code editing
execution of the application
application (or a subset of its components) testing
Generally speaking, the life cycle of an application can be described by iterating through the above mentioned steps.
 : the actions described below are described in
PyCharm Introduction: be sure to read it before starting.
Modify the HelloWorld application#
Open the file ex0_hello.py in the src directory new file (double-click on it). This is what you should find in it:
 1#!/usr/bin/env python
 2# -*- coding: utf-8 -*-
 3
 4"""Print a conventional message
 5
 6:Author: FIRST-NAME-1 FAMILY-NAME-1 and FIRST-NAME-2 FAMILY-NAME-2
 7:Date:   February 2018
 8
 9First program hello.py: display "Hello, world!" on standard output.
10"""
11
12print("Hello, world!")
Note
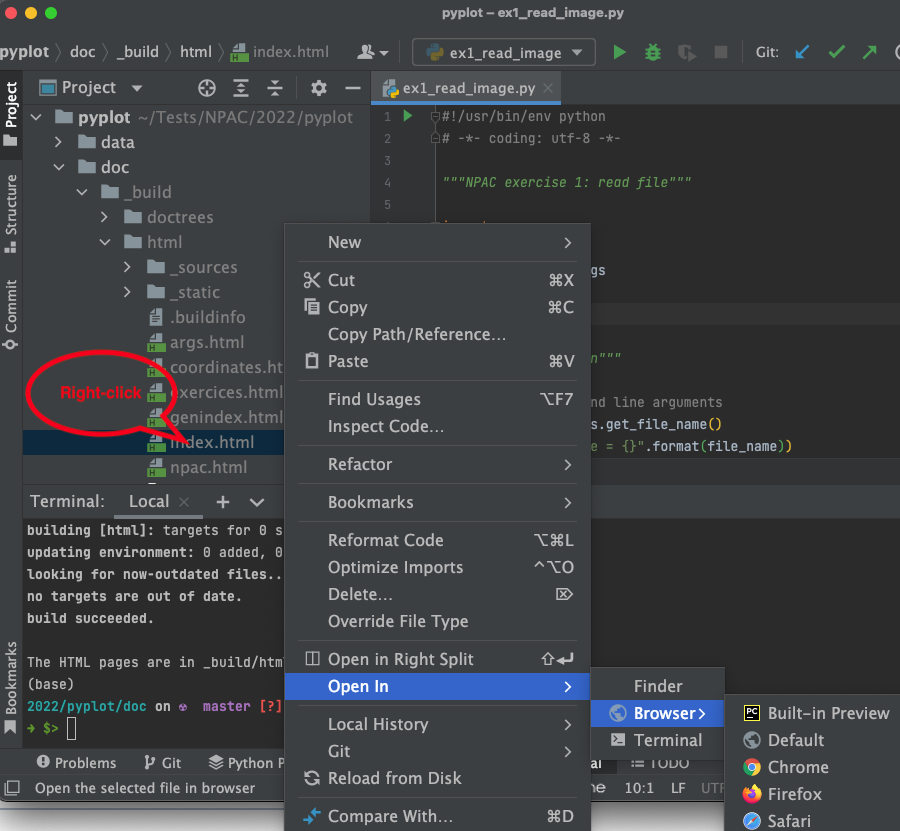
When you want to create such new file by yourself, CTRL-click or right-click on the target directory and select the menu.
After an inspection of the sources, you will see that it is a program which displays a simple message on the screen.
Note #!/usr/bin/env python on the first line, whose characters #! shall be placed at column number 1 of your
source file. This tells the unix shell two things:
the file is a script
the interpreter used to execute the script is
python(the notation here is a standard way of giving its path)
In the multi-line comment which begins and ends with triple quotes, we ask you to replace ``FIRST-NAME-1`` and similar elements with your real first and family names. This will help us to collect which student is in which group.
Note
In PyCharm, there is no menu or button: every change is immediately saved. If you want
to revert a change, enter CTRL/Z: you can enter it several times if you want to revert several changes.
Commit and/or your modifications to Git#
After making some changes, it is a good practice to commit (register) your work into Git, before testing it. During testing,
if problems are identified, you may have to make some modifications that you decide later on not to keep: Git
will allow you to ignore your last modifications without reentering the original code.
From PyCharm, committing changes to Git is done by clicking on the commit button ( )
near the top-right corner of the
 PyCharm window (the button displaying Commit changes when you put the mouse
on it without clicking). This will open a dialog showing the files that will be committed. To actually commit your
changes, you need:
Check the modified/added/deleted files that will be part of the commit. At this stage, you should see the
ex0_hello.pyfile you just edited.Enter a commit message: the commit message must reflect what has been done in the changes committed. It should be short (a few lines maximum, generally a one-line summary followed optionally by a bullet list) but meaningful. Take care that
PyCharmproposes as the default commit message the last one entered: you must review it as there is generally no reason to have two successive commits with the same commit message. Quality of the commit messages is part of the grading.Commit your changes by moving the pointer to the
Commitbutton: this will open a menu. Select if you just want to commit your changes locally or if you also want to push your changes to your reference repository.
For now, we’ll commit and push changes at the same time. But you may want to push your changes only when you have
tested them. In this case, if you didn’t make any new change during testing, the Commit button will do nothing
and you have to use the menu to push the changes.
Execution and testing#
It is now time to run and test the application!
The first time you want to run an application, you need to CTRL-click on the application source file
and select the menu . After that, the application will appear in the list on the left of the run
button ( ) where you can select it if it is not the current one (the one that will be run by the
 button).
You should check that your application behaves as expected. If not, fix the problems.
Push your changes to the reference repository#
When you are done with testing, optionally after fixing the problems you identified and committing the changes (feel free to commit several times when fixing problems), push them to your Git reference repository, in the usual way (see Commit your modifications).
Check the code quality#
Another component of the development workflow is the code quality assessment. Details about what is code quality and
why it is important can be found in the Software Quality presentation in the Slides area.
There are many tools available to help with assessing and improving the code quality. We selected one, SonarQube,
which is a web application that allows you to spot the quality problems easily in your code with a suggestion on how
to fix problems and the reason why it is considered a problem. This application is available at
https://sonar.lal.in2p3.fr. To access it, you have to authenticate with your username (npacnn, e.g. npac03) and
the password given to you during the initial presentation.
Once logged in, you should see the list of projects you have access to: normally, the project that has
been created as a result of the git push done earlier (you can bookmark the project URL for quicker access later).
Look at your project page:
The time of the last check is at the top-right corner
There are counters for three different categories of problems: bugs, code smells and duplication. You will probably mainly encounter code smells which are pieces of codes that will make your code more difficult to maintain and will have to be changed at some point. Associated with it, is the technical debt which measures the estimated time necessary to fix the problem: if you don’t do it now, you may have to spend it later to be able to add new features. In this sense this is considered as a debt (something that you will “pay” later).
Duplication is another source of potential problems, but in general the fix is trivial.
The added value of such a tool is that it allows to spot without effort something that could be tricky to detect just looking at the code, as it sometimes involves correlations difficult at a glance.
Every time you push your changes, in addition to the validation test, the CI runs a program which analyzes your code and register the results in a database accessed through the web application. That means that the score and problems found (may) change at every push.
At this stage, you should not have any problem spotted by SonarQube.
Anyway, as for the validation test, it is important that you begin to become familiar with this
tool that will be used along all this course.
Step 3: Familiarization with Python#
In this section, we’ll modify incrementally the ex0_hello.py application to introduce
a few important features of the Python language.
Functions#
Functions are a key feature for modular development. Below is an example:
 1#!/usr/bin/env python
 2# -*- coding: utf-8 -*-
 3
 4"""Print message 'Hello, world!'.
 5
 6:Author: FIRST-NAME-1 FAMILY-NAME-1 and FIRST-NAME-2 FAMILY-NAME-2
 7:Date:   February 2018
 8"""
 9
10import sys
11
12
13# By convention, a function name must contain only lowercase characters and _.
14def PrintMsg(txt):
15    """Print a message received as an argument.
16
17    :param txt: a string to print
18    :return: status value (always success, 0)
19    """
20
21    print(f"Message: {txt}")
22    return 0
23
24
25# The following test is considered as a best practice: this way a module
26# can be used both as a standalone application or as a module called by another
27# module.
28if __name__ == "__main__":
29    status = PrintMsg("Hello, world!")
30
31    sys.exit(status)
Replace the content of ex0_hello.py with the code above.
This small program illustrates several important features, presented in Python Introduction Notebook:
Contrary to many programming languages, there is no semicolon at the end of a statement.
Spaces at the beginning of the lines are important and denotes blocks as there is no
{}or equivalent block delimiters. For a given block, every line must start with the same number of spaces. The first line of the module must start at the first character of the line. You need to pay attention to this as this is a common source of error when starting withPython. The positive consequence is that it makes the code pretty readable as it is not possible to write code independently of its structure. Look at the example to see how indentation is used.Comments are prefixed by the
#character and may be the entire line or follow the code. They must be indented by the same amount of space as the code below.By convention, every module, function, class or method definition must start with a docstrings, a special form of comment used to document what the component does. They are delimited by “””triple double-quotes”””. Docstring conventions are documented in PEP 257.
There is no variable definition: a variable is created the first time it is receiving a value, and the type is not attached to the variable, but to the value. If the variable later receive another value, this value can have a totally different type.
importallows to include another module (file). Here it includes a standard module,sys. This module is usually included in almost any application and defines functions and variables whose name is prefixed bysys.: in the current application, we are using the function allowing to exit the application with a status (sys.exit()).defintroduces a function definition. The function code is a block that must be indented from thedefline.if __name__ == "__main__":: pattern to allow a file to be either imported or run directly. For example, in this case the functionPrintMsg()could be used by another module after importing this one.
As in the previous step, after editing ex0_hello.py:
Commit your changes in
Git: in the commit dialog ( ), check that all the files you have
modified have been added to the commit. If some are missing, quit the dialog (
), check that all the files you have
modified have been added to the commit. If some are missing, quit the dialog (Cancelbutton) and do aCTRL-clickon the file name, then choose menu item.Run and test your modifications: fix them if necessary and commit the changes if any.
Do not forget to replace
FIRST-NAME-1and similar elements with your real first and family names.Push your changes to your reference repository.
Check the code quality#
As before, after pushing your changes, check the code quality (it is not necessary to check
the validation tests until the next exercise as there is no particular
validation of these exercises). Connect to SonarQube (https://sonar.lal.in2p3.fr) and look
at the result: it may display one code smell, that we put on purpose in the example.
Click on it to learn more about the problem. You should see that the function name do not follow the usual Python community habits. In itself, it doesn’t prevent the program to run but on the long-term, it increases the risk of misunderstanding by other programmers. The associated technical debt is rather low, meaning there is no reason not to fix it. This is what is powerful in the technical debt concept: this is not about what is good or bad, this is a metric to help you decide if the problem is worth the effort immediately (or if you can afford it). If you decide to postpone the resolution, you know that it means you will have to spend this amount of time (this is an estimation) in the future.
For code smells, you have one rose block per code smell whose first line is the reason followed
by .... If you click on these ..., you will get a detailed explanation about why it is
a bad practice or something that must be changed, with a suggestion on what to do when this
is not trivial. Above the code smells you have the name of file where it occurs:
if you click on this file, it will open it at the line where the problem is located.
Again, at this point, the goal is to understand how work this tool to be able to use it efficiently in the next exercises. Even if the problem raised here is a minor one, this is also a good illustration of a problem that is not easy to detect when you just looked at the code, as you tend to concentrate on the structure or other aspects.
Before going on, fix the code smell, commit and push it and check that SonarQube no longer report any flaw in your code.
Keyboard Input#
You will add the possibility to enter the message to display with the keyboard or as an argument on the
command line. Once the message has been entered, it will be printed with the
PrintMsg() introduced in the previous step.
To achieve this, we’ll use the get_string() function, from the npac.args module. This function reads
the text passed on the command line and, if none has been given,
ask it interactively using the Python function input(): (see Python Inout Output Notebook). It returns
the string (even if the text could be interpreted as a number) or None if the string is empty or the
command line argument has already been read. It can be passed a string argument that will be displayed as a prompt.
It is a good practice to let the user know that you are waiting something from him and what! To use this function,
you need to import it from the npac.args module. A typical example is:
from npac.args import get_string

txt = get_string('What do you want?')
Edit ex0_hello.py (keep the same file name, Git will allow to come back to
previous versions if needed): be sure to update comments to reflect the current changes.
After modifying ex0_hello.py, commit your changes to Git, build, test and validate
the application as explained in the previous stage. This involves:
Commit your changes in
Git: in the commit dialog ( ), check that all
the files you have modified have been added to the commit. If some are missing, quit the dialog
(
), check that all
the files you have modified have been added to the commit. If some are missing, quit the dialog
(Cancelbutton) and do aCTRL-clickon the file name, then choose menu item.Run (
 button) and test your modifications: fix them if necessary and
commit the changes if any.
button) and test your modifications: fix them if necessary and
commit the changes if any.Push your changes to your reference repository: this is generally done by selecting
Commit and Pushin the commit dialog ( ). If you have not done it
but all your changes have already been committed (
 button refuses to launch
the commit dialog), you can do it with .
button refuses to launch
the commit dialog), you can do it with .Assess the code quality using
SonarQube.
Loops#
You will now improve the program to allow entering several messages to be displayed at once. To achieve this, you will ask repeatedly a message to be displayed until an empty line is entered, store each message and print all the messages at the end.
To implement this, we’ll introduce two Python features:
Loops: in
Python, like in most languages, there are two kinds of loops (see Python Code Layout and Control Flow Notebook):The
forloop allows to iterate over a list of values (here a list of string).The
whileloop (also called conditional loop) iterates as long as a given condition is true. Less used than theforloop, it is useful when you don’t know in advance how many times you will run through the loop, for example when you want to read from the keyboard until a certain value is entered.breakcan be used in both forms of loops to exit the loop prematuraly
Lists: a
Pythondata structure that is often used as a substitute for what arrays are in other languages (see Python Variables and Types Notebook).
Below are a few hints about these features:
The
whileloop is typically controlled by a boolean variable (or expression): iteration will continue until it isFalse. It is important to both initialize the variable toTruebefore entering the loop (else it will never be executed) and to change its value toFalseat some point in the loop block (else you’ll have an infinite loop). You will have to decide which condition you will interpret as the end of the input: it could be an empty line, the stringthe endor whatever you consider convenient.Lists: conversely to arrays in many languages, they have no initial dimension. They can be extended as needed with different methods, for example
append(). In this case the argument must be a unique value to append to the list.
As previously, edit ex0_hello.py (keep the same file name, Git will allow to come back to
previous versions if needed): be sure to update comments to reflect the current changes. The goal
is to store each line entered by the user in a list and then to process the list to print each line
entered instead of printing immediately what has been read! Once this has been done, you are free
to implement variants where all lines are joined before being printed for example.
After modifying ex0_hello.py, commit your changes to Git, build, test and validate
the application as explained in the previous stage. This involves:
Commit your changes in
Git: in the commit dialog ( ), check that all
the files you have modified have been added to the commit. If some are missing, quit the dialog
(
), check that all
the files you have modified have been added to the commit. If some are missing, quit the dialog
(Cancelbutton) and do aCTRL-clickon the file name, then choose menu item.Run (
 button) and test your modifications: fix them if necessary and
commit the changes if any.
button) and test your modifications: fix them if necessary and
commit the changes if any.Push your changes to your reference repository: this is generally done by selecting
Commit and Pushin the commit dialog ( ). If you have not done it
but all your changes have already been committed (
 button refuses to launch
the commit dialog), you can do it with .
button refuses to launch
the commit dialog), you can do it with .Assess the code quality using
SonarQube.
Step 4 : Check the result of the validation tests#
After you have pushed your changes to your reference repository, the continuous integration (CI) will run a validation
test of your applications. This is done at every push and for all applications present in your repository that are
recognized by CI test pyplot-checks (also called a build job), i.e. this exercise and all the five following ones.
After the push, you can:
Retrieve the status of the test:
running,successorfailedGet the summary of the test when it has failed (default) or whatever the status is
Download the test log to get more details about the error
For getting all this information, you have a script in your top-level directory called check_commit_status.py.
You can execute it from PyCharm: the first time you need to CTRL-click or Right-click on
it and choose
menu, then you can just use the usual ( ) button after selecting
check_commit_status.py in the list on the left of the button.
You can also run it from the PyCharm terminal ( ), using the command:
./check_commit_status.py
check_commit_status.py accepts several options (--help for the details). The most useful ones in the context
of this course are:
--build-job pyplot-checks: only return information about validation tests. It includes the test status and the test summary if the test failed. It ignores the other test (sonar) which is used for analyzing the code that should never fail.--download-logs: retrieve the test log if the test fails.--all-job-logs: also retrieve the information when the test succeeds. It is generally better to use also--build-job pyplot-checkswith this option, else the output may be difficult to read (very long, in particular if--download-logsis used).
check_commit_status.py is a core tool for the development workflow used in this course: please take the
time to understand how it works.
Exercise signature#
The tests run as part of the continuous integration. They are are expecting certain values as the exercise output: it is called a signature. In the following exercises, you will see that at the end of almost every step, you will be asked to print a message corresponding to the expected signature: this message will contain the result of the computation done during the exercise step.
For this initial exercise, the signature is the print() statement given in the code snippet at the beginning of step 3.
In case you modified it during your tests, for check_commit_status.py to report a success, be sure to print the
message entered with:
print("RESULT: Message = {}".format(txt))
If you pass the parameter common.fits to the application on the command line, the expected signature is:
RESULT: Message = common.fits
Step 5: Use of Git History#
In this step, we’ll see how the Git history (history of the commits) can be displayed to look
at what was done and to identify the changes introduced by one specific commit. Git history
allows much more than that, including deletion of some commits, rollback of changes introduced
by a particular commit… These advanced features are not necessary for this course and can
be confusing for people starting with a version control system or with Git.
If you already have some experience with Git or another DVCS and are interested to learn about these features, feel free to ask the teachers. You may also find some information about them in the Git Introduction.
Display the Git History#
To display the Git history, click on
 tab at the bottom of
 PyCharm window and then on the  tab at the top of the new pane displayed.
Depending on your preferences, you can either keep the version control pane as it is, increase
its height by moving up its upper side (above the  tab) or detach it from
the
 PyCharm window so that you can resize it independently of the main window. To detach it,
do a CTRL-Click on the  tab and select .
There are other display modes available: feel free to play with them to find the most appropriate
for you. To go back to the default mode, do a
 CTRL-click at the same place and
undo your selection.
The  pane shows a history of your modifications (commits) in reverse chronological
order (the most recent commit first): each line is a commit (marked as a dot on the history line)
with the first line of its associated commit message displayed on the right. This underlines
the important of an appropriate first line in the commit message, summarizing what has been done
in the commit (with more details on the following lines of the commit message):
the full commit message is available below the history, when you select a commit.
Prefixing some commit lines, you should see the following labels:
 ,
,  and
and  .
If this is not the case, it means that you have not done properly the commit and push actions
described in previous steps. These labels inform you in particular about where will be added
the next commit and the status of the synchronization with your reference repository.
 is the commit on top of which the next commit will be added.
In the proposed exercises, as the branches are not used, it should be the top commit
in the history.
 is the last commit in the master branch. The master branch
is the default one into which all the exercises will be done.
 is the last commit that has been pushed to your reference
repository. If this is not the same commit as
  , it means that you need
to push your last commits, using menu.
This is important to ensure regularly that you pushed your changes to your reference repository
as this is your backup in case of a big mistake like deleting your working area
or a problem with your desktop.
Note
 and
and  are called branches.
 is where your development happens and at every commit this label
should move to your last commit.
  is a special branch,
called a remote-tracking branch, used to track the contents of your reference repository.
Warning
Do Not Checkout a Revision
When you CTRL-click on a commit in the history, you are proposed several menu choices.
One of them, is not recommended at all. It will not do
anything harmful by itself but it will put your Git working area in a mode (DETACHED
HEAD) where it may be non-trivial to follow the instructions in the following exercises
and to push your modifications to the reference repository which is your backup!
Displaying the changes introduced by a commit#
In the Git history, if you click on a commit, you will get a list of the modified files on the right side. Double-clicking on a file will open a difference window that shows each section of the file modified and the contents of the modifications.
Some References#
These might help in case you are a bit lost with Python:
Our internal Python notebooks, which are by no means exhaustive but introductions to a few elements of Python needed throughout this hands-on. The links are in the right column of this page. Start with Python Introduction Notebook.
A Python Quick Reference Guide, a highlight to the Python Programming rules and syntax.
Welcome to Python for you and me, a simple book to learn Python programming language, for the programmers who are new to Python.
The Official Python tutorial & the Official Python FAQ
